Want to multiply your Sansevieria? Learn exactly how to propagate snake plant from leaf cuttings using our foolproof, step-by-step masterclass.
How to Propagate Snake Plant from Leaf Cuttings: The Ultimate Beginner-Friendly Masterclass
Look, I get it, plant care can be frustrating but nothing tests your patience quite like trying to expand your indoor jungle on a tight budget. You see those gorgeous, architectural snake plants lining the shelves of your local boutique nursery, look at the price tag, and suddenly your wallet starts sweating.
Here is the real talk: you do not need to drop a ton of cash to fill your apartment with beautiful greenery. In fact, you can turn a single, healthy snake plant leaf into an entire family of new baby plants.
Snake plants—botanically known as Sansevieria or Dracaena trifasciata—are legendary for being nearly indestructible. They survive in dim corners, tolerate low humidity, and don’t care if you forget to water them for weeks. Because they are so incredibly resilient, they are also fantastic candidates for multiplication.
Whether you are looking to gift a plant to a friend or want to populate every corner of your room, learning how to propagate snake plant from leaf cuttings is a total game-changer. Here at LeafCare.xyz, we are completely dedicated to stripping away the mystery of plant care, so let’s break down exactly how to pull off this satisfying botanical project without a single ounce of stress.

Understanding Snake Plant Genetics: The Variegation Quirk
Before we grab our cutting tools, we need to address a highly fascinating piece of plant science. Snake plants come in many stunning varieties. Some are solid green, while others have gorgeous golden-yellow borders running down the edges of their leaves, like the highly popular Sansevieria laurentii.
If your trying to propagate a snake plant with those beautiful yellow stripes using a leaf cutting, there is a catch you need to know about. When you chop a leaf into segments and root it, the new baby pups will almost always lose their yellow borders and revert back to completely solid green.
Why does this happen? The variegation (the yellow stripes) lives in a specific layer of cells that doesn’t pass down its traits through leaf cuttings. If keeping that exact yellow stripe is dealbreaker for you, you will need to propagate your plant via division—which means gently separating the root clumps when you repot. But if you are excited to grow a collection of beautiful, hardy green plants, leaf cuttings are the absolute funnest way to go.
Choosing Your Propagation Medium: Water vs. Soil
When it comes to rooting snake plant leaves, you have two primary paths: placing the cuttings directly into a glass jar of water or burying them in a pot of loose soil. Both methods work beautifully, but they offer completely different experiences.
To help you decide which route fits your lifestyle best, here is a quick overview of how the two methods stack up.
| Propagation Method | Visual Progress | Risk of Rot | Total Maintenance | Time to See Pups |
| Water Propagation | Excellent (You can see the roots grow through clear glass) | Medium (If water is not changed regularly) | Low (Change water once a week) | 2 to 3 months |
| Soil Propagation | None (Hidden beneath the substrate surface) | Low (If using a gritty, succulent mix) | Very Low (Occasional light misting) | 3 to 4 months |

Step-by-Step Guide: How to Propagate Snake Plant from Leaf Cuttings
Because snake plant cells move at a slow and steady pace, this project requires a bit of patience. But if you follow this structured protocol, your success rate will be incredibly high.
Step 1: Prep and Sanitize Your Blade
A clean cut is the absolute foundation of a healthy propagation. Because your leaf cutting will need to sit in moisture for several weeks, any bacteria introduced by dirty household scissors can cause the tissue to turn mushy and rot within days. Wipe down a sharp knife, pruners, or a razor blade with rubbing alcohol before making your first cut.
Step 2: Select and Harvest a Healthy Leaf
Look for a mature, firm, and completely healthy leaf near the outside base of your donor plant. Avoid using leaves that are wrinkled, yellowing, or showing signs of pest damage. Slice the leaf off cleanly near the soil line.
Step 3: Chop into Multi-Inch Segments
Lay your harvested leaf flat on a clean surface. Cut the leaf crosswise into segments that are roughly 3 to 4 inches long. A single large leaf can easily yield three to five individual cuttings!
Critical Expert Warning: You must keep track of which end of the cutting was facing “down” toward the roots and which end was facing “up” toward the sky. Plant tissue has a built-in polarity. If you accidentally flip a cutting upside down and place the top end into the water or soil, it will never grow a single root cell.
Step 4: Let the Cuts Callus Over
Do not rush to put your fresh cuttings straight into water or dirt. Because snake plants are succulents that store a massive amount of moisture in their leaves, the raw, open wounds need time to dry out. Leave your leaf segments sitting on a dry paper towel in a shaded room for 2 to 3 days. The cut edges will form a thick, protective skin called a callus. This callus acts as a shield against fungal pathogens and prevents the proccess of decay.
Step 5: Option A – Rooting in Water
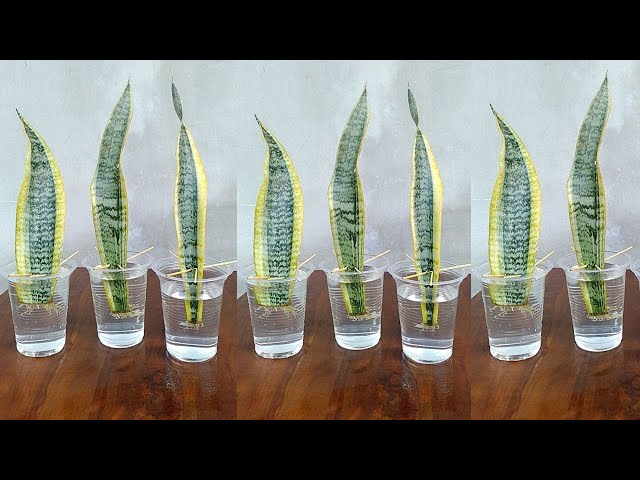
If you choose the water method, place your callused cuttings upright into a clean glass jar. Pour in about an inch of room-temperature water—just enough to submerge the bottom edge of the cutting without covering the entire segment. Change the water completely every 5 to 7 days to keep it fresh and oxygenated.
Step 6: Option B – Rooting in Soil
If you prefer soil, fill a small container with a well-draining succulent or cactus mix. Push the callused bottom end of each leaf segment roughly a half-inch deep into the dirt, pressing the mix firmly around the base so the leaf stands completely upright. Water very sparingly—only when the soil is bone-dry.
Step 7: Position in Perfect Light
Place your propagation station in a spot that receives plenty of bright, indirect sunlight. A windowsill that faces east or north is ideal. Avoid harsh, direct afternoon sun, which can dehydrate the cuttings or trigger a massive outbreak of green algae inside your water jars.
The Waiting Game: What to Expect Next
Now comes the ultimate test of your plant parent resolve. Snake plant cuttings are notoriously slow rooters. You might look at your jars week after week and see absolutely zero changes. Don’t panic! As long as the leaf segment remains firm, green, and rigid, the biological magic is happening deep inside the tissue.
Typically, you will see fine white root hairs pop out of the base within 4 to 6 weeks. Once a solid network of roots forms, the cutting will start developing an underground rhizome (a thick, bulb-like root structure). From that rhizome, a tiny, bright green baby snake plant pup will eventually push its way upward. Once the pup is a few inches tall, you can safely pot it into a permanent home using a high-quality mix, ensuring you add a gentle fertilisar later in the growing season to boost its development.
Keep Your Jungle Thriving
Learning how to propagate snake plant from leaf cuttings is an incredibly rewarding milestone that transitions you from a casual plant owner to a confident green curator. It teaches you to slow down, trust the natural cycles of growth, and appreciate how resilient nature truly is.
Whenever you need practical, judgment-free advice on watering schedules, lighting setups, or pest control, make LeafCare.xyz your ultimate digital resource. We are here to help you navigate every single root sprout and new leaf with absolute clarity.
Are you ready to chop your snake plant and start your own propagation station this weekend? Which method are you going to try first—water or soil? Let us know your thoughts or drop your specific plant questions in the comments below! If you want to keep your indoor jungle thriving, make sure to bookmark this page and subscribe to our weekly newsletter for fresh, actionable indoor gardening tips delivered straight to your inbox.
