Drowning your favorite houseplant by mistake? Don’t panic. Learn exactly how to save a plant with root rot and bring it back to life today.
How to Save a Plant with Root Rot: The Ultimate Judgment-Free Rescue Guide
Look, I get it, plant care can be frustrating but nothing strikes absolute terror into the heart of a plant parent quite like realizing your green baby is drowning from the bottom up. You bought a stunning Monstera, a trendy Fiddle Leaf Fig, or a classic neon Pothos, and you wanted to show it love. So, you watered it. And then you watered it a little more just to be safe. Now, the leaves are turning a weird mushy yellow, the stems are drooping, and there is a distinctly funky smell coming from the drainage holes.
First of all, take a giant breath and drop the guilt. Overwatering is overwhelmingly the number one cause of houseplant death worldwide. It does not mean you are a bad plant parent, and it definitely doesn’t mean you should give up on your urban jungle dreams. It just means you loved your plant a little too much with the watering can.
Here is the real talk: underneath that soggy dirt, a silent battle is happening. Root rot occurs when stagnant water cuts off oxygen to the soil, causing anaerobic bacteria and fungi to attack and destroy the root system. Once the roots turn to liquid mush, they can no longer send water or nutrients up to the leaves, which is why a drowning plant actually looks like it is dying of thirst.
Can you fix it? Absolutely. In this comprehensive, expert-led guide, we are going to break down exactly how to save a plant with root rot before it is too late. At LeafCare.xyz, we are your go-to resource for indoor plant parents looking to grow a thriving green space at home without all the unnecessary botanical shame or dense textbook jargon.
Diagnosing the Damage: Is It Really Root Rot?
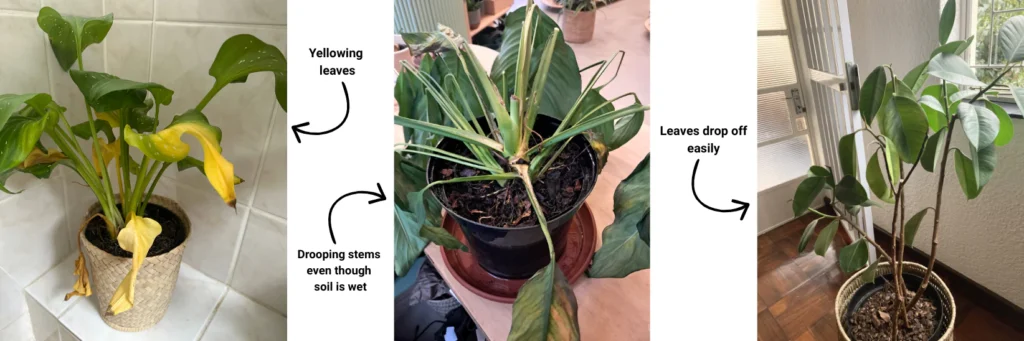
Before you go ripping your plant out of its container, you need to confirm what is actually going on under the hood. Because the above-ground symptoms of overwatering can look shockingly similar to underwatering, you have to look for specific visual and textural clues.
Above-Ground Warning Signs
When you are trying to figure out how to save a plant with root rot, your first clues will appear on the foliage. Look out for leaves that turn pale yellow, feel soft and limp rather than crispy, and drop off the plant easily. If the stems near the soil line look dark brown, waterlogged, or feel squishy when you squeeze them gently, the rot has already started climbing up the plant’s main structures.
The Underground Truth
The only definitive way to know if you are dealing with this fungal issue is to inspect the roots directly. Healthy roots should always feel firm, flexible, and look creamy white or light tan. Rotten roots, on the other hand, are a total horror show. They are pitch black or dark brown, slippery, mushy, and the outer sheath of the root will slide right off in your fingers, leaving behind a thin, thread-like core. Plus, it will smell exactly like a stagnant, muddy swamp.
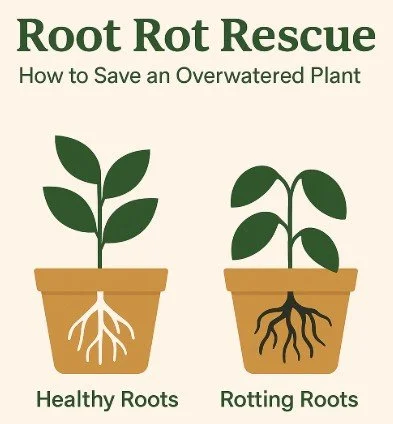
Healthy Roots vs. Rotten Roots Care Summary
To help you easily distinguish between a healthy underground ecosystem and an active emergency, refer to this quick diagnostic breakdown.
| Root Attribute | Healthy Root System | Rotten Root System (Emergency) |
| Color Profile | Crisp white, cream, or light tan (depending on species). | Dark brown, jet black, or translucent gray. |
| Texture & Feel | Firm, snappy, stringy, and holds its structure when handled. | Mushy, slimy, slippery, and breaks apart with zero effort. |
| Scent | Earthy, fresh, clean, reminiscent of a forest floor after rain. | Sour, sulfurous, decaying, or smelling heavily of rotten eggs. |
| Foliage State | Perky, vibrant green, open, and actively pushing out new growth. | Drooping, wilted, mushy yellow, or shedding leaves from the base. |
Step-by-Step Guide on How to Save a Plant with Root Rot
Now that you have confirmed the diagnosis, it is time to perform emergency plant surgery. Follow this precise, step-by-step recovery proccess to give your houseplant the highest possible chance of survival.
Step 1: Unpot the Plant and Shake Off the Crime Scene
Take your struggling plant over to a sink, a plastic tarp, or an outdoor space. Gently grip the base of the stems and slide the entire root ball out of the pot. If it is stuck, tap the sides of the container to loosen the dirt.
Once it is out, you need to get rid of the wet, contaminated soil. Gently massage the root ball under room-temperature water to wash away the mud. Do not reuse this old soil! It is packed with the fungal spores that caused the damage in the first place, so toss it straight into the trash.
Step 2: Perform Radical Root Surgery
Grab a pair of sharp pruning shears or kitchen scissors. Before you make a single cut, sanitize the blades thoroughly with rubbing alcohol or boiling water. If you skip this, your just going to spread the fungus to the healthy parts of the plant.
Carefully snip away every single piece of black, slimy, mushy root. Be aggressive here. If you leave even a tiny speck of rotten root behind, the fungal infection will keep spreading. Cut back until you see only healthy, firm, white root tissue. Clean your scissors with alcohol between cuts to maintain a sterile environment.
Step 3: Prune Back the Top Foliage to Match
This is a step that trips up almost everyone. If you just chopped away 50% of your plant’s root system, the remaining 50% cannot physically support 100% of the top leaves. It will cause the plant to exhaust itself.
To give your plant a fighting chance, cut away a proportional amount of the top foliage. Focus on removing the oldest, yellowest, or most damaged leaves first. This reduces the overall workload on the recovering roots, allowing them to focus entirely on rebuilding rather than trying to feed a massive canopy.
Step 4: Disinfect the Remaining Root System
To guarantee that the destructive fungus is completely eradicated, you want to bathe the remaining healthy roots in a mild disinfectant bath. Mix one part standard 3% hydrogen peroxide with two parts water in a spray bottle or small bucket. Gently spray or dip the roots into this solution. You might hear it fizzing and bubbling—don’t worry, that is just the peroxide killing off the microscopic fungal spores and pumping pure oxygen directly into the wounded root tissue.
Step 5: Repot in Fresh Soil and a Clean Container
If you want to use the exact same decorative pot, you must scrub it thoroughly with hot water and dish soap to kill any lingering bacteria. Better yet, switch to a raw terracotta or unglazed ceramic pot, which naturally breathes and absorbs excess moisture from the dirt.
Fill the bottom of the pot with a fresh, highly aerated soil mix. Never use dense, heavy garden soil from outside. Instead, grab a high-quality indoor potting mix and blend in a generous amount of perlite, pumice, or orchid bark. This ensures that water can drain out instantly, creating those crucial air pockets that roots need to stay alive. Place the plant in the pot, gently pack the fresh dirt around the roots, and step away from the watering can. Do not water it for at least 3 to 5 days to allow the cut root ends to fully callouse over.
The Post-Op Recovery Phase: What Happens Next?
Once your plant is safely tucked into its clean house, your primary job is to provide absolute environmental stability. Do not apply any synthetic chemical fertilisar for at least six to eight weeks. Feeding a plant with a compromised root system will immediately scorch what is left of its fragile roots and finish it off for good.
Place your recovering patient in a warm room with bright, indirect sunlight. Avoid placing it in dark corners where the soil will stay damp for too long, and keep it safely away from drafty windows or blowing air conditioning units.
When you do eventually resume watering, always use the finger test. Shove your pointer finger two inches deep into the potting mix. If it feels moist, cool, or damp, do not water it. Wait until the soil feels completely dry, light, and airy before giving it another drink. Consistency and restraint are your best friends during this delicate transition.
Building Confidence on Your Indoor Gardening Journey
At the end of the day, dealing with a severe case of root rot is simply a natural part of the learning curve. Every single experienced horticulturist and plant collector has accidentally drowned a plant along the way. It’s not a sign that your failing; it’s just a sign that you are interacting with a living, breathing ecosystem that requires a bit of fine-tuning.
By learning how to spot the early warning signs, creating loose, well-draining soil mixes, and monitoring your hydration habits, you can easily protect your green collection from future drainage disasters. Whenever you find your trying to figure out a weird spot, a dropping leaf, or a strange texture on your foliage, remember that LeafCare.xyz is always right here by your side as your ultimate, judgment-free guide to creating a truly spectacular and thriving indoor sanctuary.
We want to hear your success stories! Have you ever successfully brought a plant back from a bad case of rotten roots? What variety of houseplant was it? Drop a comment down below to share your tips, bookmark LeafCare.xyz so you always have expert plant medicine advice right at your fingertips, and make sure to subscribe to our weekly newsletter to get practical, fluff-free indoor gardening strategies delivered straight to your inbox every single week!
